
Individual cream puffs are a lot of work, but this cream puff dessert delivers the same flavors and textures in a simpler format. Your guests will think you’ve gone all out!
This cream puff dessert is one of the many potluck-friendly desserts made in a 13×9 pan. The big difference-maker here is the crust, which is the same pastry used for cream puffs. It’s a sophisticated detail that will earn you a lot of credit despite the fact that it’s surprisingly easy to make.
The dough used to make cream puffs is choux pastry. In French, choux means cabbage, which seems like an odd choice of words. Years ago, an unknown pastry chef decided that pans of baked cream puffs looked like Brussels sprouts. In French, those are petit choux, or little cabbages, and the name stuck.
Cream Puff Dessert Ingredients
Butter: Butter will enrich the dough and help the pastry puff nicely.
Flour: All-purpose flour contains the necessary gluten to trap steam in the dough, making it puff dramatically.
Eggs: Use room temperature eggs for best results.
Cream cheese: Softened cream cheese gives the filling its tangy richness.
Chocolate pudding: Combine milk and chocolate pudding mix with the cream cheese for a silky filling.
Whipped topping: Whipped topping provides a sweet layer atop the rich chocolate filling.
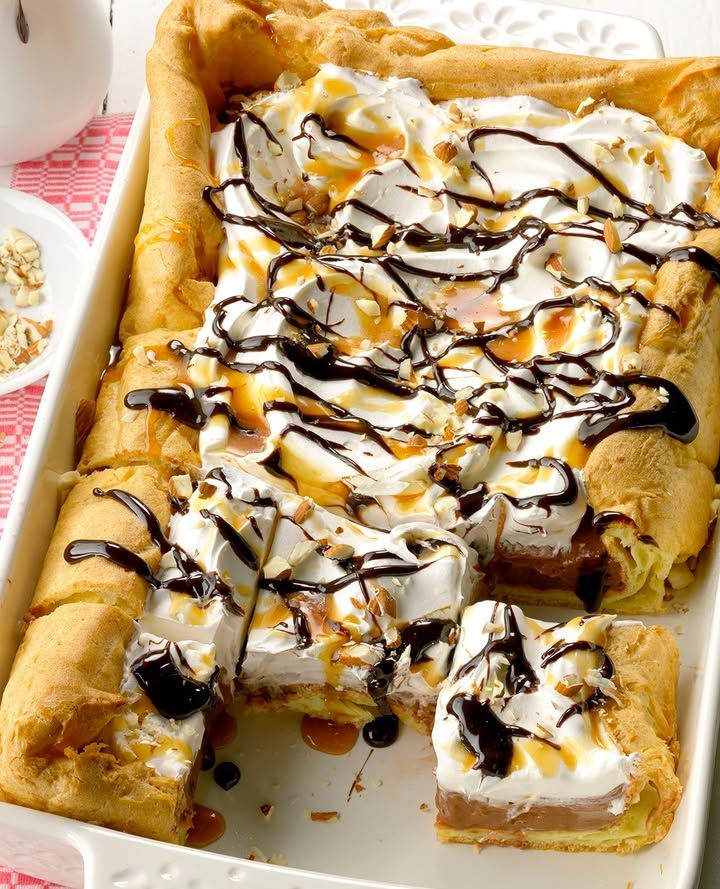
Chocolate and caramel ice cream toppings: Drizzling caramel and chocolate over the whipped layer creates a beautiful appearance with minimal effort.
Almonds: The chopped almonds make an attractive garnish and bring a pleasing textural contrast to the dessert.
Directions
Step 1: Mix the cream puff dough
In a large saucepan, bring the water and butter to a boil over medium heat. Add the flour all at once, then stir vigorously until it forms a smooth ball of dough.
Step 2: Add the eggs
Remove from the heat and let the dough stand for five minutes. Add the eggs, one at a time, beating until each egg is fully incorporated. Continue beating until the mixture is smooth and shiny.
Step 3: Bake the crust
Spread the dough into a greased 13×9-inch baking pan. Bake the crust at 400°F for 30 to 35 minutes or until puffed and golden brown.
Step 4: Let the crust cool
Transfer the pan to a wire rack and let it cool completely.
Step 5: Make the filling
To make the filling, beat the cream cheese, milk and pudding mix in a large bowl until smooth.
Step 6: Add the filling
Spread this filling over the puffy base, then refrigerate for 20 minutes.
Step 7: Finish the dessert
Spread the whipped topping over the chocolate filling and refrigerate until you’re ready to serve. Before serving the dessert, drizzle with the chocolate and caramel toppings and sprinkle with the almonds.
Cream Puff Dessert Variations
Change the pudding: You have plenty of options for a different flavor of pudding! I bet a caramel or butterscotch pudding would work well with the existing toppings, and so would banana pudding. To invert the color scheme, use a vanilla pudding mix for the filling layer and top with homemade chocolate whipped cream. In this case, consider white chocolate ice cream topping as one of your garnishes, along with either dark chocolate or caramel.
Dial up the richness with a cheesecake filling: The combination of chocolate pudding and cream cheese results in something that’s similar to cheesecake. Lean into that flavor and pick a filling from our extensive list of no-bake cheesecake recipes.
How to Store Cream Puff Dessert
Any uneaten cream puff dessert should be covered and refrigerated immediately. You can cover the pan itself or transfer the uneaten portion to a food storage container with a tight-fitting lid.
How long will this cream puff cake recipe last?
The leftover dessert should be eaten within three or four days. That’s partly because the cream cheese filling is perishable, and partly because the crust will become soggy.
Can I freeze the cream puff dessert?
Yes, the pudding, cream cheese and whipped topping contain enough stabilizers to freeze and thaw nicely. The topping is soft, so freeze any leftovers first and then wrap them for storage. If you’re deliberately making a pan ahead of time to freeze and serve later, leave off the ice cream toppings. Cover the pan and freeze the dessert, then slide it into an oversized freezer bag and squeeze out as much air as possible.
NEXT PAGE
ADVERTISEMENT
